Adding HTML to an Email Content
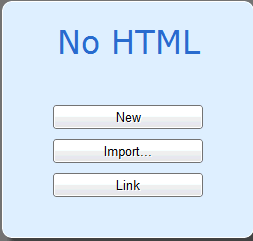
HTML can be added to an Email Content by:
- Importing a HTML file.
- Linking to another Creative.
- Creating new content.

| Note: |
Email Manager will break a line of code beyond 500 characters. This is
to ensure that emails are delivered, as servers may bounce messages with
lines longer that 500 characters.
Email Manager chooses a natural break
to perform this functionality. To chose your own break simply add a line
break before the 500 character limit.
|
Importing a HTML File
- Click the Import...
button.
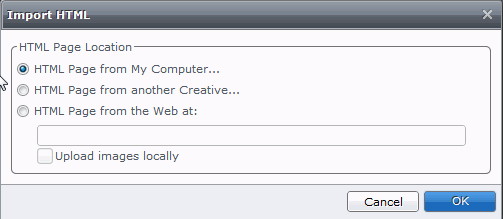
- Select one of the following options:
- HTML Page from My Computer
- HTML Page from another Creative
- HTML Page from the Web at

HTML Page from My Computer
- Click OK
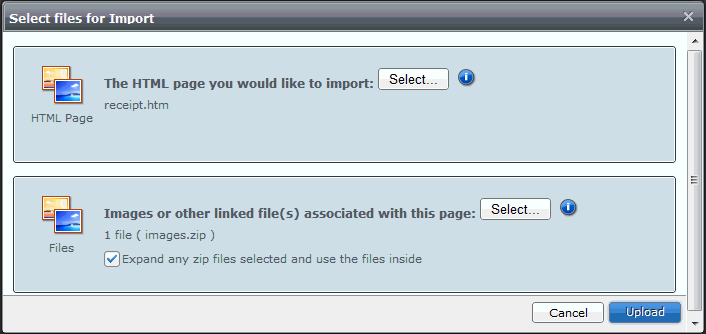
- Search for the HTML page by clicking the Select button next to the HTML page
you would like to import:
| Note: |
You can only upload one html page per Creative. |
- Search for the images to be imported by clicking
the Select button next to
Images or other linked file(s) associated with this page:
| Note: |
Multiple images can be imported from different locations on your computer. |
- Select the Expand
any zip files selected and use the files inside check box if
you want to unzip the zip file you have imported.
- Click the Upload
button.

- Click OK.
You are then taken to the Content
Processor.
After you have mapped any Variables, changed your Variable
Delimiters to be {}, and mapped any Events, your Creative will open in
Design View.
HTML Page from another Creative
- Click OK.
- From the Document Explorer search for the Creative
whose HTML content you wish to import.
Once the Creative has been selected a list of Content
Items appears in the pane.
- Select the relevant Content Item and click
Import.
You are then taken to the Content
Processor.
After you have mapped any Variables, changed your Variable
Delimiters to be {}, and mapped any Events, your Creative will open in
Design View.
| Note: |
Using this option creates a copy of the original html file, this copy
will not be updated should you update the original. |
HTML Page from the Web at:
- Insert the Web address in the box underneath.
- Check the Upload
images locally check box to save any images locally.
- Click OK.
You are then taken to the Content
Processor.
After you have mapped any Variables, changed your Variable
Delimiters to be {}, and mapped any Events, your Creative will open in
Design View.
| Note: |
When using anchor tags the hash symbol '#' needs to be replaced with three
question marks '???'. The question marks are substituted with the hash
upon deployment. Using the hash symbol within creative builder will not
resolve upon deployment causing the link to stop at the point of the #. |
Linking to HTML used in another Creative
This option allows you to link to HTML content used
in another Creative.
- Click the Link
button
- The Document Explorer opens to allow you to
search for and select the Creative to link to.
- Once you have selected the Creative, a list
of Content Items appears in the pane.
- Select the relevant Content Item and click
Insert.
Email Manager inserts an {embed} tag into your Creative
that points to the other Creative. This tag is the link. Using the link
functionality allows you to modify the linked Creative and have any changes
reflected in any Creative linked to it.
| Note: |
You will only see the {embed} tag in any of the views, however the Content
is visible in the Send a Message preview or in Gallery View.
If you link content from another Creative's Content, only the HTML content
is embedded in the Creative.
HTML content does not include variables, images etc. If you link Contents
within the same Creative, all content, html, variables, images etc. is
embedded.
|
New
This option allows you to input the contents of your
Content directly using either HTML in Source View or typing text in the
WYSIWYG (what you see is what you get) editor in Design View. We therefore
recommend a good working knowledge of HTML is needed to use the New option.
Using Source View
The content is written in the white area of the screen.
Email Manager automatically numbers each line for you. If you do not
wish to see this line numbering:
- Click anywhere within the source content.
The View button
on the Ribbon bar will now be enabled.
- Click on Show
Line Numbers.

To reactivate the line numbers follow the steps above.
The following buttons are available to assist you in
Source View:
|
Icon
|
Description
|

|
Find and replace. Allows you to search
for and replace any relevant HTML code.
Enter the text in the
search box, and click Find
to search forward and Previous
to search backwards.
Enter text in the Replace
box to use the find and replace function. Click Replace
to replace the currently selected search term with the replace
term.
Click Replace All
to replace all instances of the search term. Clicking on CTRL
+ F within the source editor will also display this functionality.
|

|
Allows you to insert
a variable into your design. Variables can be new, imported,
shared or a Creative Variable. |

|
Allows you to insert
an event. Events can be new, imported, shared or a Creative
event. |

|
Allows you to embed HTML from another Creative.
|

|
Allows you to insert special. These are
links for your Creative. The links are Tell a friend, view
link, link form to list, link form field to list field. See the
General
Data Collection section for further information. |

|
Content
Processor. |

|
Clear Content. |
Once you have entered your HTML run the process button
to see if there are any mapping requirements, then click the Save
button on the Ribbon bar.
Using Design View
Design View allows you to select your styles, font
sizes, colors etc. From the Design View Ribbon Bar. In addition the icons
available in Source View are also available in Design View.
Once you have entered your text run the process button
to see if any variables require mapping, then click the Save
button on the Ribbon bar.
Inserting Images
Images can only be inserted in Design View. To insert
an image into your Content Type the image must already exist on the Creative.
The image must be uploaded via Campaign
Files.
-
Click the image button on the tool bar
 . .
-
Three tabs: Image Info, Link and Advanced are
available:
-
Image Info: Allows you to browse the images
stored on your Creative.
-
Link: Allows you to inset an image source URL
and select the target for the image.
-
Advanced: Allows you to apply style sheet classes,
styles etc. to your image.
To insert
an image from the images stored on your Creative:
-
Select the Image
Info tab.
-
Click Browse.
A list of images associated with the Creative will
appear.
- Select the image, and click the Insert
button.

- Enter the text to accompany the picture in
the Alternative Field.
- Change the Width and the Height of the picture
if required, and apply any borders etc.
- Click OK.
Editing an Image
- Right click on the image.
- Select Image
Properties.
- You can specify the lock aspect ratio icon
functionality here. When the icon is in lock state the image aspect
ratio is protected.
| Note: |
Click on the  icon to restore
the image back to its default settings. icon to restore
the image back to its default settings. |
|


 .
.

 icon to restore
the image back to its default settings.