Email Manager - ADMINISTRATION |
HOME |
UsersUsers must be assigned to a user group. Please note that when users are created by default they will have all permissions granted to them. By default users will only be able to see other users within the same group as them. Creating a User
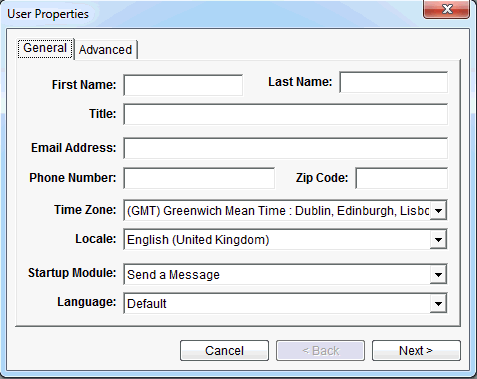
The User Properties screen opens:
This screen allows you to add the user’s name, email address etc., as well as configure their Startup Module. Configuring the Users Startup ModuleThe user startup module is the module users see when they login in to the system. By default this is set to ‘Send a Message’. To change the module:
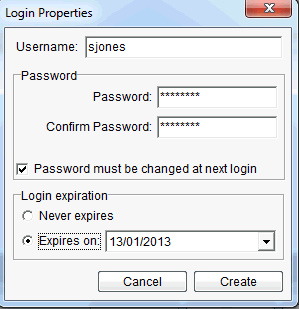
When you have completed this screen, click the Next button to set the password and password permissions for the user. Creating a User's Sign on Details
Select the Password must be changed at next login check box if you want to set a default password for the user that they will be forced to change when they first log in to the system. You can also set the date the login expires.
Setting User PermissionsUser permissions allows an administrator to specify what their users can see and do in Email Manager. To set a user's permissions:
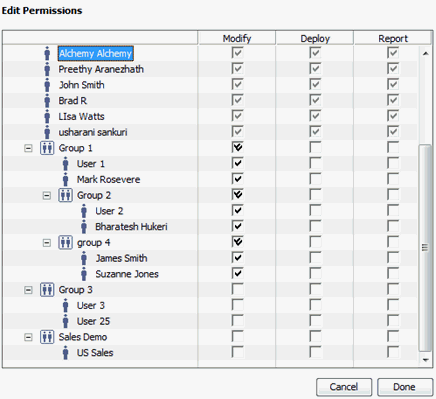
Setting Permissions for Creative CategoriesBy default, users who are not Administrators are only able to modify, deploy and report on their own group’s Creatives. To give permissions to groups, or individuals within groups, to be able to modify, delete or report on Creative categories:
Groups are structured hierarchically, so applying the permissions to a group lower down in the structure, in this case 'Group 2', also applies it to any groups above it, in this case 'Group 1'. Setting User Permissions for CreativesCreatives are the child of Creative Categories and therefore if no permissions are set for Creatives then the default permission used is what is selected for the Creative Category To give permissions to groups or individuals within groups to be able to modify, delete or report on Creatives:
As groups are structured hierarchically, applying the permissions to a group lower down in the structure will also apply the same permissions to any groups above it. Setting User Permissions for List CategoriesBy default, users who are not Administrators are only able to edit properties, edit records or deploy their own list categories. To give permissions to groups or individuals within groups to be able to edit properties, edit records or deploy list categories:
As groups are structured hierarchically applying the permissions to a group lower down in the structure, will also apply the same permissions to any groups above it. Setting User Permissions for ListsLists are the child of list categories and therefore if no permissions are set for Creatives then the default permission used is what is selected for the List Category. To give permissions to groups or individuals within groups to be able to modify, delete or report on lists:
As groups are structured hierarchically applying the permissions to a group lower down in the structure, will also apply the same permissions to any groups above it. Setting User Permissions for ModulesBy default all modules are available to all users, however if you do not want certain users, or groups of users to be able to see certain modules, for example Send a Message then you can edit their permissions so that the module is not visible to them. To edit module permissions:
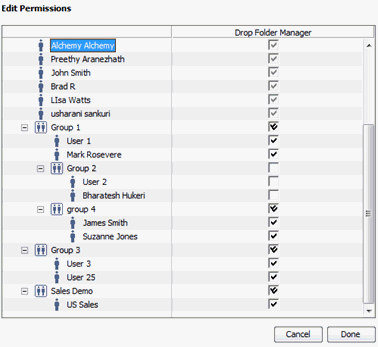
Setting User Permissions for Reply to MailboxesTo give permissions to groups or individuals within groups to be able to modify, or deploy reply to mailboxes:
As groups are structured hierarchically applying the permissions to a group lower down in the structure, will also apply the same permissions to any groups above it. Resetting PasswordsAdministrators can reset passwords of all users in their group. Normal users can reset their own passwords, but not those of the others in their group. To reset a password:
Editing Users
The User Properties dialogue opens, it contains three tabs:
Editing User Permissions
|
|
|
© Alterian. All Rights Reserved. | Privacy Policy | Legal Notice |   
|
 icon at the bottom of the Select a User
pane.
 icon
in the User Properties
screen to add the Username and Password permissions.


 under Select
a User.
 under Select
a User.