Creating Lookup Table Data
Lookup Table data can be imported, or created
manually. The table values can then be used as static or conditional variables
in the body of a Content.
| Note: |
Uploading
a lookup table into Creative Builder where one of the cells includes variable
data with an EMBED variable, for example, {EMBED:Test_Template}
will cause an error message if the template name is used. This function
works correctly if the Template ID is used instead. |
When creating a lookup table, key values that contain
a comma are not supported.
Importing Data into a Lookup Table
There are three ways of importing data into a Lookup table:
- By using the Import Data
button on the New or Edit Lookup Table User Interface.
- By selecting a previously created Lookup Table and clicking the
Import Into... button. Click
here
for more information.
- By using the New button
in the Value Conversion section in a variable. From here you can import
or manually create a Lookup Table.
Importing Data into a New Lookup Table
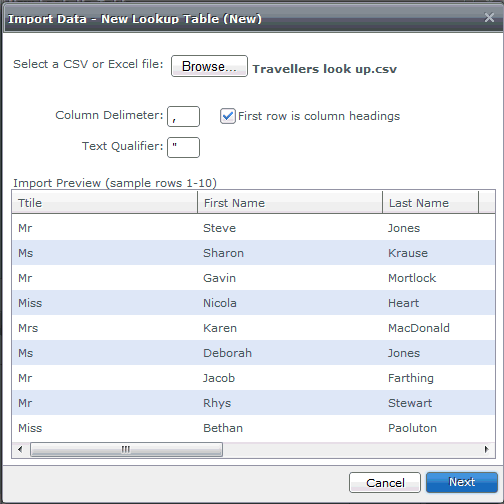
- Click the Import Data button.
- Click Browse to search
for the relevant CSV or Excel file.
To Import a CSV File
- Select the relevant CSV File.
| Note: |
The Column
Delimeter and the Text Qualifier are automatically detected, and can be
amended. By default the first row of your CSV file is set as the column
headings. |
The data will import with a sample preview. This is the first 10 rows
of your CSV file. If there are more than 10 rows in your CSV file these
are not shown here.

- Click Next.
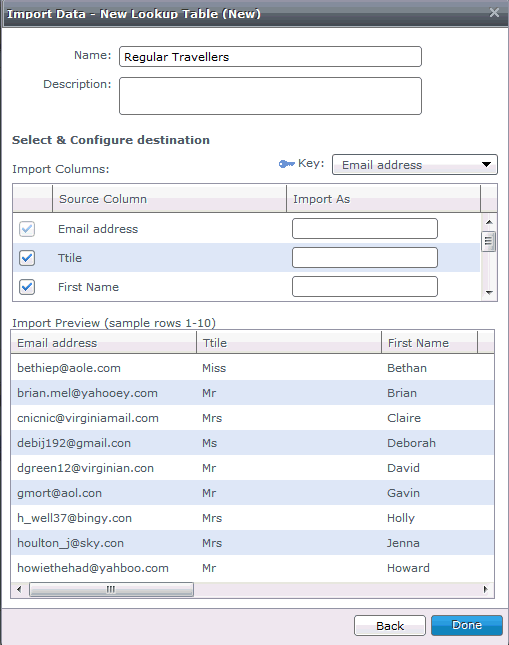
- The name for the Lookup Table
automatically defaults to the name of the CSV file. This name can
be amended if required.
- Enter a description for the Lookup table, if required, in the
Description field.
- The Lookup key is based on the first column name. To change the
key to another column click on the drop-down arrow next to the key
field:

- Uncheck any columns that you do not want to import into the Lookup
table. Please note that the column selected as the primary key cannot
be unchecked.
- If you are importing the data for the first time you will see text
boxes in the ‘Import As’ column. These text boxes allow you to rename
the column headers in the look-up table data. If you are importing
data into an existing Lookup Table you will see drop-down arrows
in the ‘Import As’ column. The drop-downs allow you to map the columns
from the selected file to the columns in the Lookup Table.
- Click Done.

To Import an Excel File
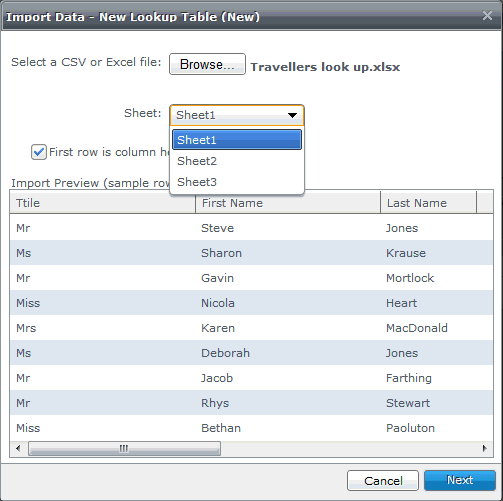
- Select the relevant Excel File.
- Select the relevant sheet.
The data will import with a sample preview of the first 10 rows of your
Excel Spreadsheet. If there are more than 10 rows in your Spreadsheet
these will not be shown here.

- Click Next.
- Enter a name for the Lookup table in the Name field.
- Enter a description for the Lookup table, if required, in the
Description field.
- The Lookup key is based on the first column name. To change the
key to another column click on the drop-down arrow next to the key
field:

- Uncheck any columns that you do not want to import into the Lookup
table.
- If you are importing the data for the first time the Import As
column rows will be blank. If you have imported data into the Lookup
table before then these rows might have data mapped in them.
- Click Done.
Manually Creating a Lookup Table
- On the Creative Overview tab select the Lookup
tables tab within the Shared Elements section.
- Click New.
- Enter the lookup table name in the Name
field.
- Enter a description in the Description
field.
- The lookup table is created with two columns a Key column, and
a Value column. Note:
the key column is mandatory.
- Change the name of the Key or Value column by:
- Clicking the drop-down arrow on the column name.
- Select Update Name.
- Enter the new column name and click OK.
- To add new columns to the lookup table, click the New
Column button.
- To add new rows to the lookup table click the
 button.
- To delete rows from the lookup table click the
 button.
- Click the Save button once
the lookup table is completed.
| Note: |
The information
contained in the preview pane for the Lookup table does not include the
primary key column in its row count. |
|
|


 button.
 button.