Email Manager - LIST MANAGEMENT |
HOME |
Adding a New ListThis option can be used to import both Recipient lists and Suppression lists. Click on the This opens the Import Wizard. Step 1 - Select & Configure source for importSelect the input source from the drop down window. Browse to your list file, select it, and click Open. Email Manager supports Delimited Text Files (CSV), Excel Spreadsheets (.xls), Fixed Width Text files (.txt), and .xlsx files. Delimited Text (CSV) FilesSpecify your file's delimiter and text qualifier. Select the First row is column headings check box if the first row of your file contains the column headers. If your file does not contain column headers, you will be prompted to give names to the columns in your list in the next step. A preview of your file is shown. Excel SpreadsheetIf your file is an Excel Workbook with more than one worksheet, choose the worksheet you wish to import. Check the First row is column headings check box if the first row of your file contains the column headers. If your file does not contain column headers, you will be prompted to give names to the columns in your list in the next step. If importing a .xlsx file select All Excel Files (*.xl*) instead of the default Excel Files(*.xls) when browsing for the file. Fixed Width FileClick and drag to add separators that define the starting and ending point for each column. Right-click to remove separators. Click the check box if the first row contains column headers. Then click Next Step, and you will see a preview of your list.
Step 2 - Select & Configure DestinationThe first thing you will see here is a drop-down menu with "New List" and the name of the file that you have chosen to import. This drop-down gives you two options:
1. Uploading a New ListThe list name will default to the name of the file that you are uploading. You can change this by clicking on the Edit button Two check boxes appear at the bottom of the this window, and are only applicable to Recipient Lists. The first "Show in recipient preferences page. (allow opt-in)", should be checked if you want recipients on this list to be able to opt-out of the list. If you want recipients on other lists to be able to opt-in to this list, select the second check-box "Show for recipients from any list (allow opt-in)". Click Done to return to the Step 2 screen. The next step is to edit and configure the list columns that you want to import. Below, all the columns that the file contains are listed. You can deselect columns that you do not want to import at this stage. The column names default to column1, column2 etc.
The key icon Note that the small key icon next to the field name in the drop-down indicates that the field is used as a primary key in another list, but not necessarily the current list. EM will automatically assign key field status to the first column that contains discreet values. This may be the incorrect column, so make sure that you specify the correct key column by clicking on the icon next to the field that will be the Primary Key. This will typically be the email field or a customer ID field. This field is always de-duped and is used to uniquely identify each recipient in your list. You will not be allowed to make a column the primary key if it contains duplicate values. We recommend that you review the List Management Troubleshooting topic for examples of problems that are caused by incorrect use of the primary key field. We now want to map the column names to existing columns. By re-using columns, you will be able to search across lists with common fields, as well as deploy using more than one list when those lists have common fields. The Troubleshooting topic also includes a section on the problems caused by having too many fields in your database. Click the drop-down next to column1 and all existing column names will be listed. Simply select the column that you want to map to. If a suitable column does not already exist, click the [Edit] button to the right, or scroll to the bottom of the list and select the last value "New Field". This will open the "Configure New Field Type" window. Configure New Field TypeThis window lets you define additional properties for the new data field.
The Data Type drop-down menu allows you to select what type of data is contained in the field. Email Manager should already have selected a type for you. Select the Show in recipient preferences page check box if you want to make this a recipient editable field. Once they save their changes, the field will be updated in EM's recipient database. See the Unsubscribe and User Preferences section for further details. Value Propagation: This is an important option that makes it possible to store separate field values for a given recipient in each of the lists that the recipient belongs to. Options:
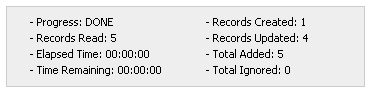
Click Done. The new column name will be in bold and the Edit button When all columns in the file have been dealt with, click the Finish button. 2. Updating an existing list.Select Existing List from the drop-down if you want to update an existing list instead of uploading a new one. You will be prompted with a list of all existing lists in the system. Select the one that you would like to update. The list of columns available to map to will only contain the columns in the list that you are updating. This allows you to easily update certain columns and recipients in a list, without replacing the entire list. As a minimum you need to include the primary key column. Step 3 - ImportingThis step displays progress information during the import and summary information once it has completed. The summary information will depend on whether you are importing brand new recipients, or recipients that already exist in EM's master table. Consider the following example:
This indicates that the imported list contained 5 recipient records. Only one of the five records was a new recipient. Of the four recipients that were already in the master list, all were updated with new information. To cancel the load, click the Abort button during a list import. Any records loaded/updated up to that point will remain. Click Done when finished. Note the following when updating lists:
Importing preferencesWith your Preferences created in Creative Builder you can start to load preferences linked to your recipients. Unlike standard fields Preferences are list agnostic. For this reason, they act subtly differently from standard list fields when loaded. The Preference name acts as the import key. Load a list with a column header that matches your Preference name (not display name). When Email Manager matches the column to the Preference it will show the Preference name and (preference) after it. If you intend to load many Preferences it may be worth developing a naming convention (example Pref_ prefix) so they group together and can be identified separately from list fields. Preferences should be used toopt recipients in or out of the preferences: Opt in = 1, True Opt Out = 0, False With the preference mapped you load the list as normal. The resulting list once loaded will NOT show the Preferences column or the preferences loaded. These would quickly become stale and inaccurate so are not shown. These Preferences are stored in a separate table. The changes loaded will however have updated the Preferences selected. |
 icon under Select List.
 . This will open the Configure New List window where you can change the list name, select an alternate category for it to be uploaded to, provide an optional description of the list, and change the list type (Recipient or Suppression).
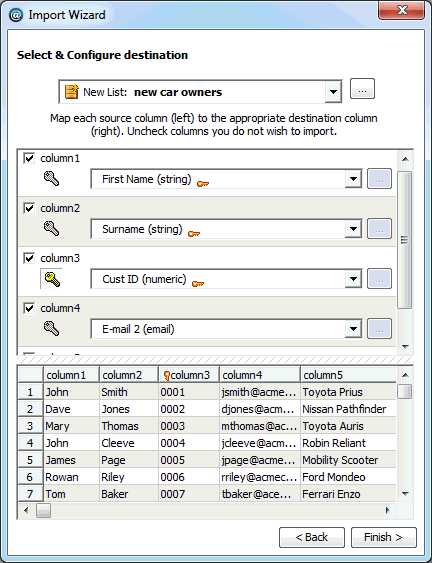
 indicates the Primary Key.

|
© Alterian. All Rights Reserved. | Privacy Policy | Legal Notice |   |