Email Manager - SEND A MESSAGE

HOME

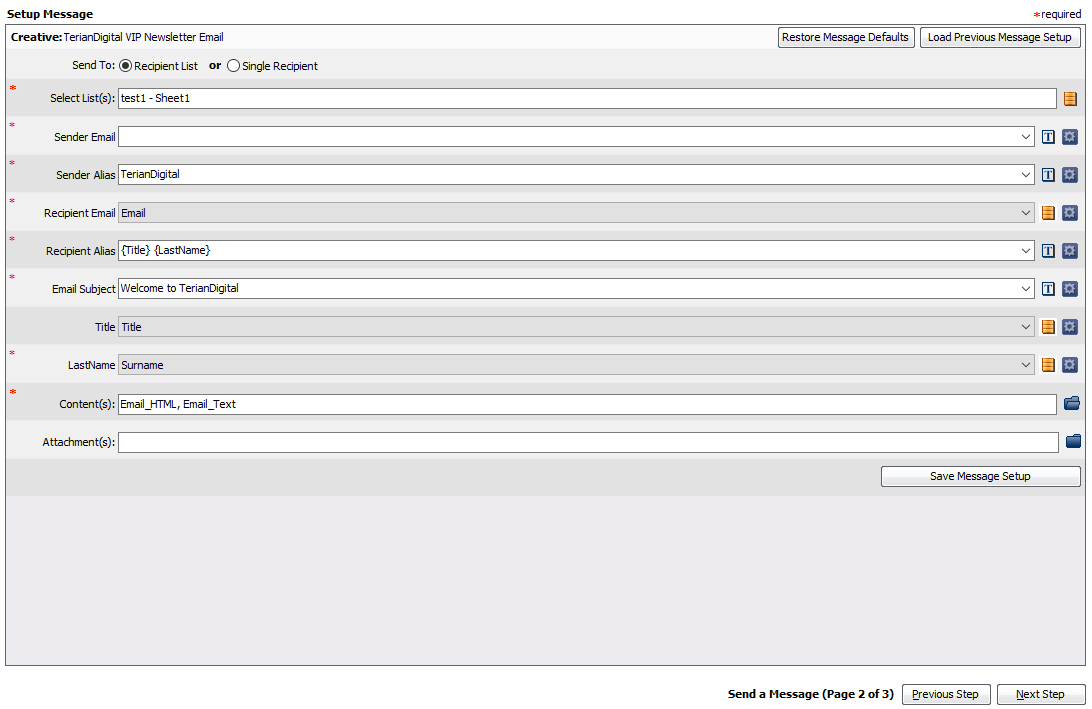
2 - Setup Message

Note:

The fields on the Setup Message screen display the setup from the last time the message was deployed or edited. To reset all fields, click the Restore Message Defaults button. Alternatively, to retrieve a saved message setup, click the Load Previous Message Setup button.

When deploying a message, you have two options - Recipient List or Single Recipient.

In a production environment you will generally use the Recipient List option for your deployments. You can use the Single Recipient option for testing or for ad-hoc seeding emails.

Note: For single recipient deployments, all message variables must be entered manually as there would be no list to retrieve variable values from.

Recipient List

Select the Recipient List option and click the icon to display the recipient lists that have been added to the system via the List Management option.

Select a list by ticking the box next to it. You can select more than one list, as long as the lists have got the same primary key.

If default mappings have been defined for a list in the Creative Builder, those mappings are displayed here.

Mandatory fields are marked with a red asterisk *.

The icons to the right of each field allow you to map variables to the field values, or to apply conditional logic.

 Icon Description
Click this icon to map the variable to a list field. The drop-down becomes active and displays all list fields that match the data type. After fields have been mapped, the icon will change to .    
Click this icon to set up a conditional value for the field variable. See the Conditional Values topic for more detailed information and examples. When conditional logic has been set up for a field, the icon changes to .  

When displayed next to the Content(s) field, use this icon to select one or more Contents to use with the message (Contents are defined in the Email Campaign Builder). Contents are displayed in alphabetical order.

You can add conditional logic to specify the template to use for each recipient. Click the Advanced Criteria button. The Advanced Settings screen opens.

Using Conditional Logic to Select Content

  1. Select the Content to be used.

  2. Click the Add Conditional Value button.

  3. This displays a number of fields that can be used to create a when statement. Click into the first field and then click the icon to select a list variable to use as the basis of your statement.

  4. Selecting a variable will populate the field with the variable's parse name, for example {to_email}.

  5. Select an operator from the 'equal to' drop down - 'equal to', 'starts with', 'contains' etc.

  6. Type in a value that the operator will resolve i.e. {to_email} contains 'gmail'. You can add multiple lines to your logic by selecting and/or from the 'done' drop-down.

  7. Finally, select the Content that will be used when the statement criteria are satisfied.

When displayed next to the Attachment(s) field, use this icon to attach files that you have uploaded using the attachments interface. The selected attachments will be formatted into a table for HTML Contents, and links for text Contents. The {Attachments} variable in your template determines where the attachments appear.
Note:

Sender Email

The Sender Email variable and available inbound mailboxes should be set up by an administrator. Manually specified addresses should only ever be used for testing purposes.

Sender Email is used as the Reply-to address in your deployment. This is the address that emails are sent when a recipient clicks the Reply button in their email client. Bounces are also sent to this address. Email Manager can process and report on messages received at this address if the email box is one that Email Manager manages.

To create email boxes for your account that EM manages, select Manage Inbound from the drop-down list in the Sender Email field. Email addresses take the form of "something@anything.dm-4.com". Where "something" is the name of the mailbox, and "anything" is what is called a Subdomain. For example, "reply@mycompany.dm-4.com" or "mycompany@dm-4.com". The subdomain is optional. Once you have created a mailbox, it will appear in the drop-down list in the Sender Email field.

Separate Forward addresses can be set up for each event type - see Configuring Reply-To Addresses for further information. You can forward reply emails that are not bounces or unsubscribes, but are questions or comments to a specific 'Replies' address.  

To use a Reply-to address that is not managed by Email Manager, select 'Manual' from the drop-down menu.

Single Recipient

To deploy without using a recipient list, select Single Recipient. This will mainly be for testing purposes.

All variables must be entered manually as there is no list to pull values from. The icon can be used as described above to set conditional logic.  

Click the Next Step button

Next: 3 - Preview Messages.

     
© Alterian. All Rights Reserved. | Privacy Policy | Legal Notice